
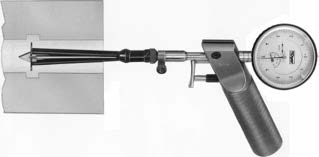
A snap-ring groove half an inch down a 3/8″ bore might be the hardest dimension on the whole print. You can’t see it, you can’t get calipers in it, and an optical comparator only works on sectioned parts. Here’s how shops inspect small-bore internal grooves without destroying parts.
Why small bores are the hard case
Standard groove gage arms need room to swing open inside the part. Below roughly 1/2″ bore diameter, most gages simply don’t fit — and grooves set deep in the bore make it worse. The gage needs long, thin, rigid arms that still expand reliably into the groove.
The purpose-built answer: precision ID groove gages
Dyer’s 210-211 Series precision ID groove gages are designed for exactly this: small-diameter, deep-set groove measurements with direct dial reading. The standard 210-211 Series covers the broader small-bore range.
Bigger bores, bigger ranges
For larger parts, the 132 Series ID groove gages handle big ranges in one gage, and the 102 Series long-arm gages reach deep grooves in large housings. Shallow grooves near the face are quick work for the 135 Series ID-OD gages.
Practical tips for repeatable groove readings
- Rock the gage. The max dial reading through the rock is the true diameter.
- Master on a ring, not a micrometer. Setting rings duplicate the measuring condition inside a bore.
- Watch groove width vs. contact width. Contacts must seat on the groove diameter, not shoulder on the groove walls — if your groove is narrow, spec matching contacts.
If your groove is smaller, deeper, or weirder than the catalog covers, that’s normal — most Dyer groove gages ship with application-specific arms. contact Dyer Gage or call the gage hotline at 1-800-631-3333 with the print.